Front Desk Policies and Procedure Manual
Purpose:
The purpose of this manual is to provide a step-by-step guide for personnel working at the front desk.
Mission Statement:
The mission at Complete Medical Care is to provide the highest level and quality of care to patients in a compassionate and professional manner. The goal internally is to create an efficient process for performing our work so we can best achieve our mission. Policies and procedures have been developed so that work can be completed in an efficient way that safeguards against errors. The Doctor especially welcomes any ideas that any employee might have that can improve this process.
Policies:
The responsibilities of the front desk personnel are to serve as a receptionist for the waiting room, answer the phone and either route the call to the appropriate person or take a message, verify insurance for patients, request deposits for office visits and surgery, obtain outside medical records as needed for patients being evaluated by the Doctor, book appointments for office visits and surgeries, request payment for medical records, copy and package medical records for mailing and manage and distribute faxes.
The front desk personnel directly communicate with patients, referring physicians, insurance companies, hospitals, sales and drug representatives and other outside persons and businesses. It is of utmost importance for the front desk personnel to be professional in their dealings with each of these groups at all times. If the front desk personnel are confronted with someone who is rude or abusive, they need to simply direct that person to the Practice Administrator or the Doctor and end the conversation. There is no situation that justifies anything but a calm and professional demeanor on the part of the front desk personnel in all dealings with outside persons, patients and co-workers.
Unless approved in advance by the Practice Administrator or Doctor, no employee may receive gifts, invitations, food, remuneration or any type of reward from patients, or other people or institutions doing business with Complete Medical Care.
Procedures:
Using the System:
Complete Medical Care utilizes an internet-based electronic medical and billing record. If you click on the Firefox icon located on your desktop, the browser will automatically open the program.

At the bottom of the page click on the last button that says “I have already registered. I want to use the Electronic Medical Record.” Then click on Submit Form and Proceed. An alert window will pop up asking for your username and password. Enter the username and password that you have been provided. You will then see another screen that asks you to enter your username and password again. Then click Submit again. You will then see the following window:

This window has menu categories across the top and specific menu items to the left. The window opens to the Front Office Menu as a default. To change the menu items to the left, click on the menu topics across the top. To select specific menu items along the left, click on the specific item. Items that have a “>” have a submenu that can be shown by clicking on the menu item.
Insurance Verification:
The first task you must perform when a new patient requests an appointment is Insurance Verification. The Doctor currently only sees personal injury, worker’s compensation and self pay patients. If a patient with insurance wishes to see the doctor, the policy is to collect a $450 payment for initial visits and $195 for follow-up visits. Self-pay personal injury patients are also required to sign a form indicating that their bill may exceed $450 depending on the complexity of the visit and they may be responsible for payment of the balance. Payment is to be made before entering the examination room. The only acceptable form of payment is cash, credit card or cashier’s check. Complete Medical Care does not accept personal checks. The patient will be given a receipt and if they request it, a billing statement, so they can file with their insurance company.
To initiate the Insurance Verification process, click on the Insurance Verification menu item to the left and you will be directed to the screen shown below:
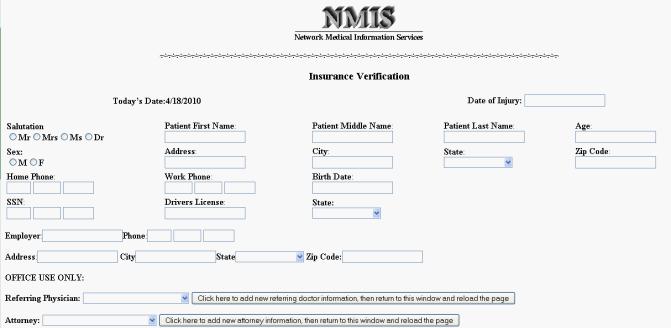
Note that if the referring physician, attorney or work comp insurance carrier does not appear in the drop-down menu, click on the appropriate button next to or below the drop-down menu. Another window will open that allows you to add the new referring physician, attorney or work comp insurance carrier. Once you enter the new information, return to the Insurance Verification form and reload the page. You can now proceed and the new information will appear in the drop-down menu.
Required fields that must be filled out include the patient salutation, name, sex, address, phone, birth date and date of injury. If there is incomplete data, when the form is submitted, an error message will appear explaining what further information is needed. It is critical to enter the patient first, last and middle name as well as the date of birth correctly because these parameters are used to create the folder that stores the patient medical records. It would be similar to misfiling a paper record.
For personal injury patients, there are two classes, a slip and fall or an MVA. Make sure you determine what type of injury the patient has and check off the appropriate box on the form.
For self pay patients, and check off the appropriate box on the form. Indicate to the patient that there is a $450 charge for an initial visit or a $195 charge for a follow-up visit due at registration. Personal checks are not accepted.
For worker’s compensation patients, you must obtain a referral request form from the referring physician. Enter the worker’s compensation data on the form. You must call the adjuster prior to scheduling the patient. Ask the adjuster to (1) list the compensable body parts, (2) indicate whether there is a dispute pending on the patient’s injury and (3) indicate whether there is a peer review that has deemed further treatment unnecessary. If there is no dispute or peer review, you may then complete the form with the necessary information.
Once you have entered the data on the form, click Submit. This will send an email to the Doctor. The Doctor will then review the form data and determine whether the patient can be seen. The Doctor will send an email back with either approval to see the patient or with additional instructions. Once you obtain the email from the Doctor you may proceed to schedule the patient.
Patient Scheduling:
To schedule a patient for an office visit, you must place your cursor over the Appointment Utilities menu tab. You will then see the submenu shown below:
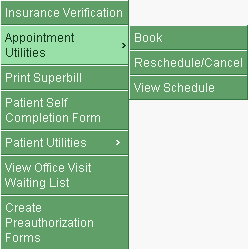
The Appointment Utilities submenu allows you to Book an appointment, reschedule or cancel an appointment or simply view the schedule. Click on the Book submenu and you will see the web page shown below:
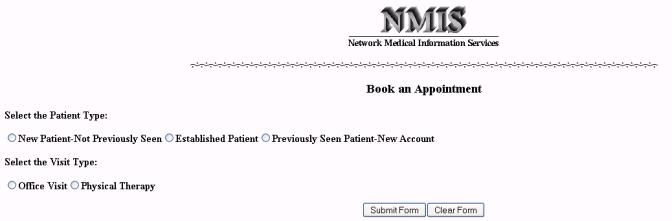
Determine whether the patient is a new patient that has never been seen by the Doctor, an established patient coming in for a follow-up visit or a previously seen patient who has a new injury. In the latter situation, a new account and folder will be created for the patient. Finally select whether the appointment is for an office visit or physical therapy. The front desk is not responsible for making appointments for physical therapy patients. This will be done by the Physical Therapist.
When you select a new patient and click on submit, you will see the web page shown below:
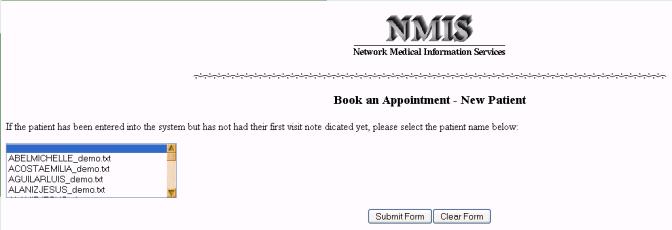
Simply scroll down to the patient’s name and click on Submit Form. You will see the web page shown below:
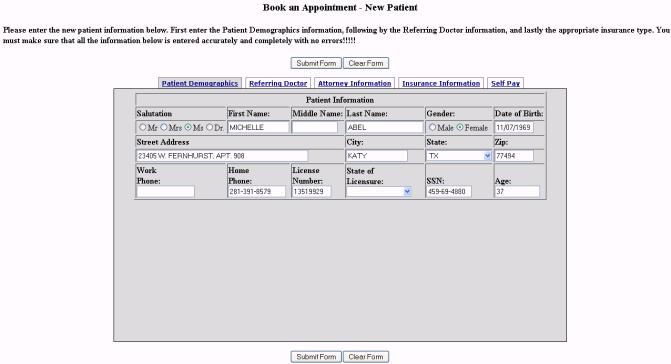
Much of the information on this form will be automatically filled in when you created the Insurance Verification worksheet. However, this is an opportunity to make sure the information is correct and complete. You can select the different tabs of the top to add information regarding the referring doctor, attorney information, insurance information or self pay information. When you are sure the information is complete and accurate, click on Submit Form. You will then see the web page shown below:
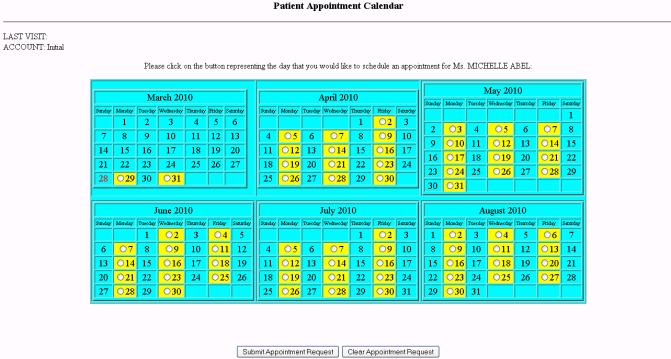
Note that you can only make appointments for up to six months in the future. The calendar has highlighted the days that are open for office visits in yellow. Select the day you wish to schedule an appointment and click on the Submit Appointment Request. You will then see a web page like the one shown below:
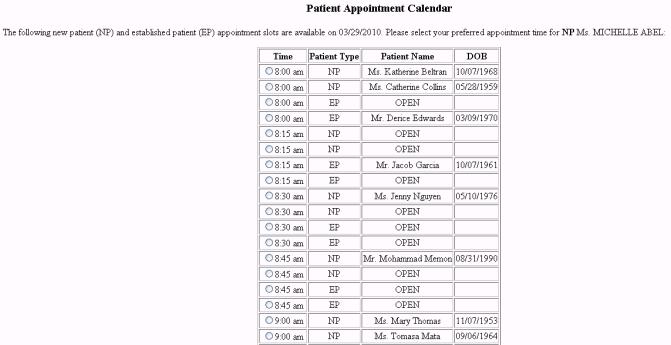
Select the time and patient type (NP for new patient or EP for established patient). Patients are seen in the mornings, Monday, Wednesday or Friday, between 8 and 11:30 AM unless other arrangements are made. When you have selected the time slot, click on Submit Appointment Request to complete the scheduling process. You will then see an appointment confirmation like the one shown below:

You have successfully booked a patient and may move on to another task.
Reschedule/Cancel Appointment:
To reschedule or cancel an appointment click on the Reschedule/Cancel Submenu under the Appointment Utilities menu item. You will then see the following web page:
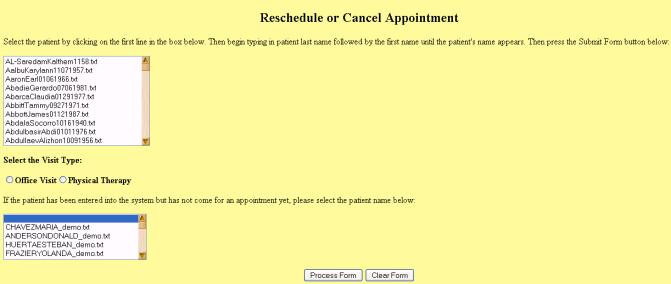
There are two different situations for rescheduling. If the patient is an established patient and has been seen in the office, use the upper scroll box to select the patient, click on the Office Visit radio button, then click on Submit Form. If the patient is a new patient that has not been seen yet or is an established patient with a new injury that has not been seen yet, use the lower scroll box. Select the patient, click on the Office Visit radio button, then click on Submit Form. You will then see the following web page:

Select the date and time for the visit you wish to change and then click on Submit Form. You will see a web page like the one below:
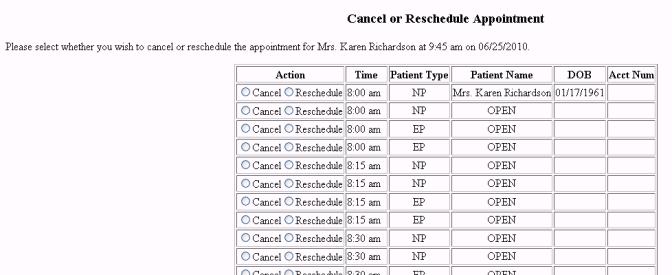
Select the appointment time and click on either Cancel or Reschedule. Then click on the Submit Appointment Request button. If you select Reschedule, you will be directed to the web page with the Calendar that you can use to reschedule in the same manner that you booked an office visit appointment. If you select Cancel, you will see a web page that confirms the cancellation. You may then move on to another task.
View Schedule:
When you click View Schedule in the Appointment Utilities submenu, you will see the web page shown below:
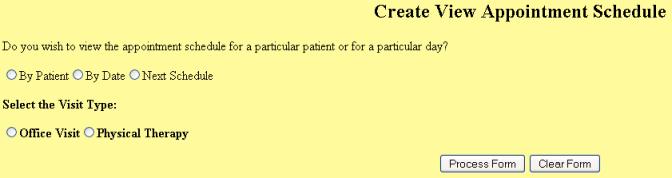
You can select a schedule based on patient name, date of the appointment or the next office visit. You also need to select whether you wish to see the Office Visit or Physical Therapy schedule. If you select By Patient and click on Process Form, you will see the following web page:
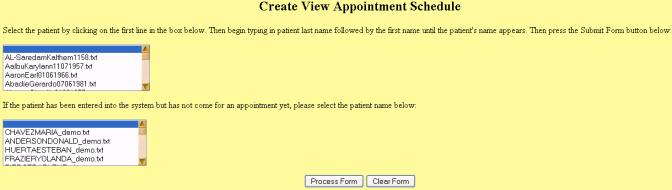
Like the Book Appointment web page, select the patient from the scroll box based on whether the patient has made a previous office visit for the injury date in question. Then click on Process Form. You will see a web page identical to the one that was generated in the Change/Reschedule Appointment process:
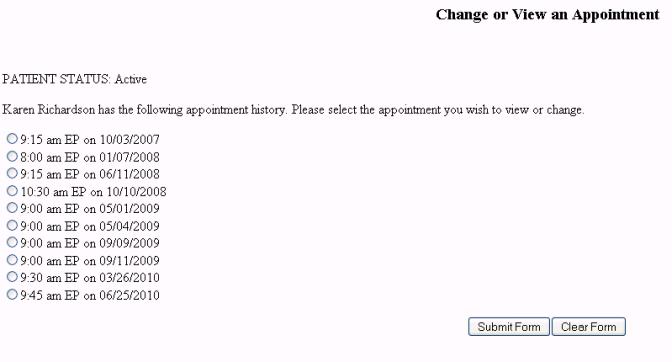
Click on the appointment schedule you would like to view and the following web page will appear:
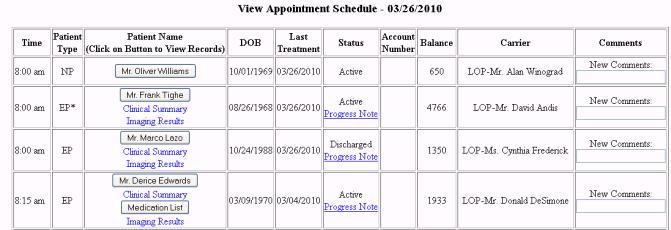
There are several useful hyperlinks embedded in this web page. If you click on the button surrounding the patient’s name, you will open a window with the patient’s folder appearing as shown below:
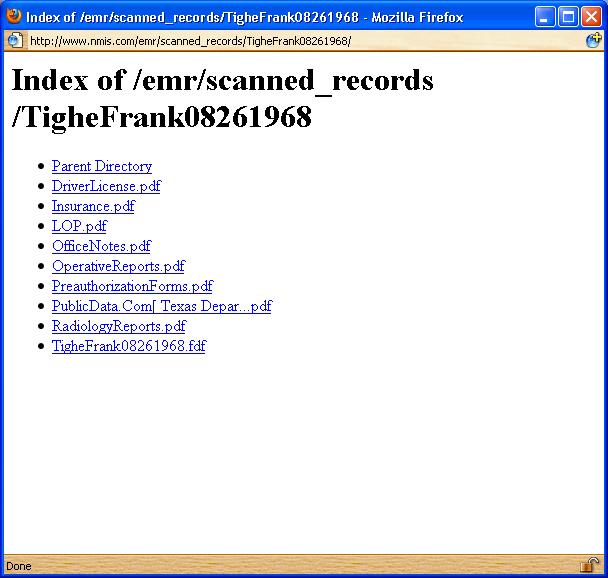
If you click on the link, you will see the patient’s scanned record such as Driver License, Insurance forms, Letter of Protection, Office Notes, etc. Make sure to close the window when you are finished, otherwise, the window disappears behind your other windows and you may have difficulty finding it when you want to look at another patient’s folder.
If you place your mouse over the links entitled Clinical Summary or Imaging Results you will see a window pop up that gives a short description.
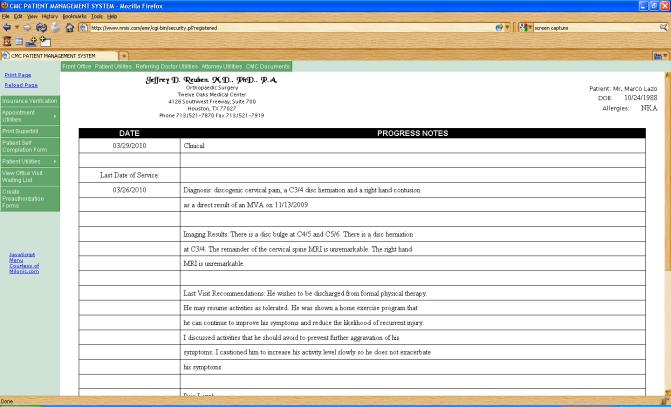
Finally, if you click on the Progress Notes hyperlink, a window will pop up that allows you to print a sheet of progress notepaper with the patient’s important information on it. This is printed out along with the superbill for all patients who are being seen in the office. The web page below is a sample of one patient’s progress note.
Print Superbill:
For each patient that enters the office, a superbill must be printed and attached to the patient’s paperwork. When you click on the Print Superbill menu item, you will see the following web page:
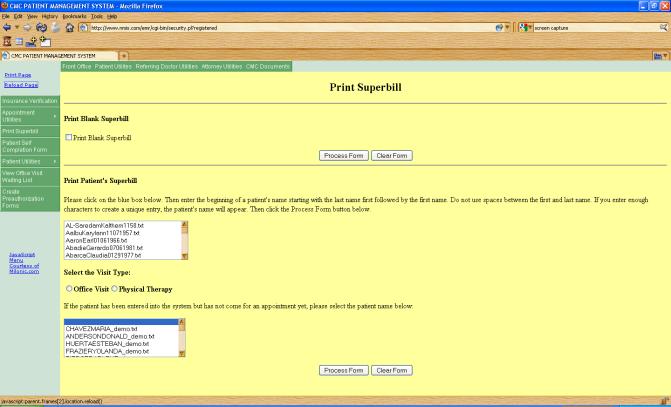
The upper part of the form allows you to print a blank superbill. To do so, click on the checkbox entitled Print Blank Superbill and then click on the Submit Form button just below it. You will see a web page with a blank superbill as shown below:
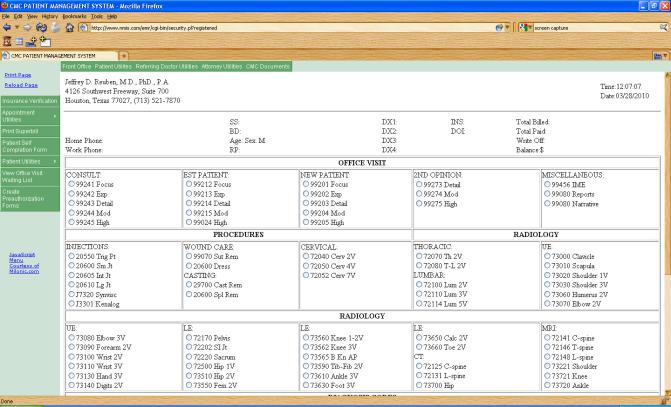
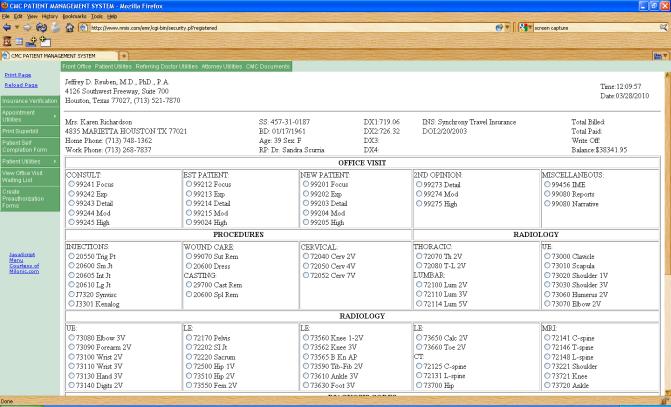
To print a superbill for a particular patient, select the patient from the appropriate scroll box depending on whether the patient has been seen before for the particular date of injury or not. Click on the Office Visit radio button, then click on Submit Form to see the following web page:
Patient Self-Completion Form:
When a new patient arrives in the office for an office visit, they are required to fill out a Patient Data Entry Sheet. There is an English and Spanish version. The patient must fill out the data entry sheet, an AOB(Assignment of Benefits) form and a medical records release form. Preprinted packets are stored in the shelf next to the receptionist’s desk. As soon as the patient completes this form, usher the patient into an empty room. Then click on the Patient Self Completion Form menu item and enter the data that the patient has provided on the form as prompted. The application asks you to enter the data on a question-by-question basis. The process is very simple and straightforward. When you complete the data entry, you will see a prompt that gives you further instructions.